Beauty
Have You Tried Home Derma-Rolling Skin Treatment Yet? Well Maybe You Should!
Read our DIY Derma-rolling FAQ’s Guide here and catch up with one of the hottest beauty trends right now!
Why do influencers & dermatologists love derma-rolling? Derma-rolling is a clever way to get the best results from the serums or creams you apply to your face on a regular basis.
We pay plenty for our serums and skin care creams, and derma-rolling lets that wonderful stuff get right down into your skin where it can be most effective!
And although it’s not a suitable treatment for everyone, (and I’ll explain who shouldn’t use derma-rolling lower down), it’s actively promoted by nearly all of the most important ‘influencers’ and skin-care experts.

So we thought it was time to share this great ‘at-home’ skin-improving method with a fabulous, HerStyleCode FAQ’s Guide!
1. What results can you expect from derma-rolling sessions at home?
Here are some of the well-reported benefits of using derma-rolling correctly as a skin enhancing tool:
- Evens out your skin tone
- Reduces the look of fine lines
- Improves the appearance of acne scars
- Enhances your skin’s overall texture
- Fades dark spots and freckles
- Improves stretch marks
- Reduces the size of skin pores
2. What exactly is derma-rolling?
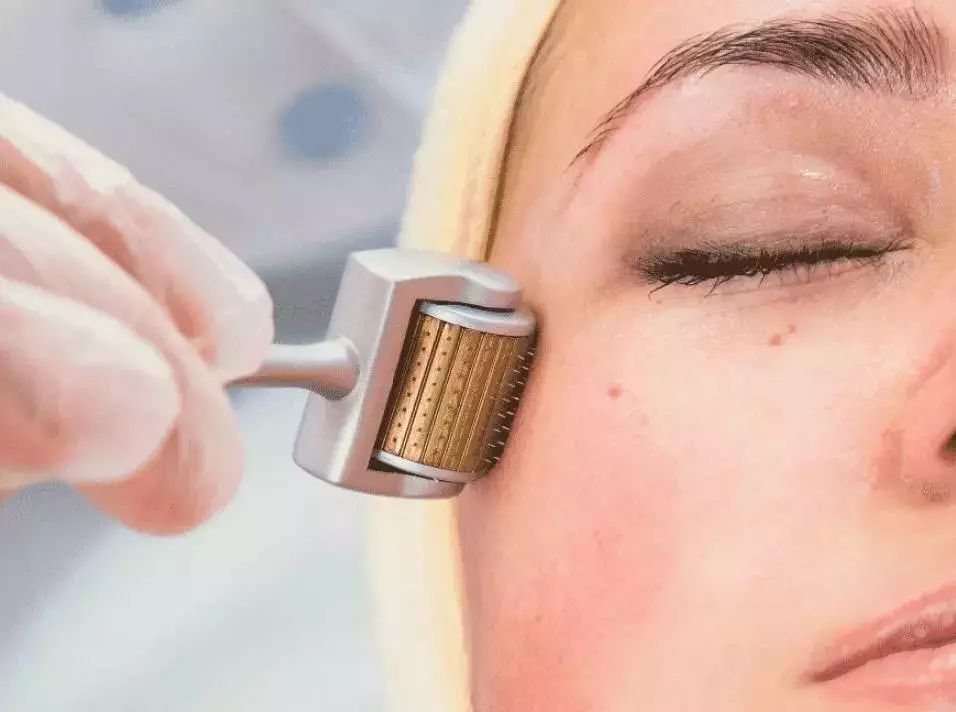
Derma-rolling is a skin treatment that rolls a needle-studded, drum-shaped, manual device over the facial skin. The effect is tiny skin punctures that allow your skin-care products to penetrate deeper into your skin’s dermal layers.
So it’s a simple way to get the full benefit of skin-care creams and serums, which you apply immediately before and after derma-rolling the surface of your skin.
3. What’s different about derma-rolling and micro-needling?
There’s some confusion about the difference between derma-rolling and micro-needling. So what you need to know is that micro-needling is a slightly deeper and more invasive clinical treatment carried out by a specially trained skin therapist.
And the needles used in professional micro-needling are longer than those on a home-use, derma-roller:
- A professional micro-needling treatment uses needles that range from ½ – 1 ½ mm in length
- An at-home derma-roller treatment uses rollers with needles up to ¼ mm in length
So if you have a professional micro-needling treatment, you will have faster and more dramatic results. But you will also experience some bleeding and need to wait a few hours for your skin to look, ‘normal, afterwards. This could mean that you need to take the afternoon off work, after a professional treatment.
On the other hand, derma-rolling is a DIY treatment you can do at home or in the office during your lunch-hour, without causing any visible side-effects on your skin.
4. Who is derma-rolling recommended for?
Everyone with a healthy skin surface that’s ready to be worked on.
Whatever improvement you are seeking, the method is to use the derma-roller first to ensure your chosen skin-product penetrates deep into your skin when you apply it afterwards.
For instance, if you have very dry skin, you can prepare your face with a derma-roller home treatment and then apply a skin-moisturizer which contains hyaluronic acid to get an enhanced result.
And if you want to brighten the surface of your skin with a Vitamin C treatment to improve elasticity, you would do a derma-roller treatment first to open up micro-channels in your skin’s layers.
5. Who is not recommended to use derma-rolling?
Derma-rolling isn’t recommended for anyone with active infections or inflammation of the skin. So it should never go anywhere near skin with active cold-sore, acne or rosacea.
And care should always be taken to not touch infected skin with anything unnecessary, as it will only spread the infection around your skin’s surface.
If you have recently undergone chemo-therapy treatment, you should also avoid derma-rolling, as this treatment makes skin extra-sensitive.
6. How often should you use a derma-roller?
At first, your skin won’t be expecting these micro-pricks, so you need to start with a light treatment about once a week. And after a couple of sessions, you can begin building up to a more frequent schedule of derma-rolling.
Depending on your skin type, you can treat your skin as much as three or more times a week for on-going benefits.
7. When’s the best time of day for a home derma-rolling treatment?
As skin is more receptive to skin creams at night and this is the time when your whole body undergoes a type of repair process, night-time is considered the most effective time of day for derma-rolling sessions.
8. How do you prepare your skin for a derma-rolling session?
Turn your work-space into a super-clean area and ensure you have cleansed your skin carefully to remove every scrap of make-up. Ensure your hands are scrupulously clean and sanitize the derma-roller by placing it in a bath of isopropyl alcohol for at least 10 minutes before you begin.
Then wash off the alcohol and place the derma-roller on a clean towel to drain.
9. How to use a derma-roller at home safely?
a) Use the best-quality tools
For safety and the best results, invest in high quality, titanium derma-rolling tools that do not exceed 0.025 mm in length. Titanium needles can take frequent use and regular sanitizing better than cheaper materials.
Poor quality needles will go blunt in a very short time, and this means you may cause micro-tears and blunt trauma to your skin. So buy the best simple, but high-quality materials derma-roller you can afford and ignore cheap derma-rollers altogether.
b) Use the correct skin-care products
When your skin is completely clean, apply a layer or two of your chosen treatment product to the area you want to improve.
If you don’t really know which product you should be using for a particular issue, just select a high-quality face treatment cream or liquid that contains hyaluronic acid, growth factor or peptides. These creams and serums are always beneficial to skin.
c) Avoid Retinol creams
Avoid using a cream that is either pure retinol, or contains retinol, as this it could cause irritation if used along with a derma-rolling treatment.
10. How do I use a home derma-roller correctly?
Before you begin, practice making light to medium passes with the roller over your skin. You should only apply light or medium pressure and make sure you’re not puncturing the surface of your skin. Then divide the areas for treatment into 3 sections – face, neck and upper chest.
Concentrate on one section at a time, and move the derma-roller over that area in a series of passes. It’s tempting to treat derma-rolling like rolling out cookie dough or pastry, but it’s important to resist that temptation. Try to make a single roll-over in one direction over each part of the section, rather than moving the roller back and forth.
In addition, you should never drag the derma-roller over your skin’s surface. This could worsen the condition of your skin. And when you are used to moving the derma-roller about, you’ll be able to make passes in any direction to create micro-channels covering each treatment area.
11. Is there a special derma-rolling after-care method?
The after-care you use after each derma-rolling treatment session is just as important as the treatment itself. So always apply another layer of therapeutic skin cream or serum after the rolling session.
Again, it’s best to avoid Vitamin A creams like retinol at this stage of the treatment, so you don’t irritate your skin.
DIY derma-rolling does not create long-term reddening of your skin, just a little, short-term rosiness that reduces and disappears after a little while. So you can do a quick rolling session at home when it suits you and then carry on with your normal activities.
12. How should I clean my derma-roller?
Cleaning your derma-roller is vitally important to ensure you avoid infection. So wash it with soap and warm water after every session and then leave it to dry naturally in the air.
And when it is totally dry, store it in its own plastic container to shield it from air-borne bacteria. Like all personal care items, never share your derma-roller with another individual.
13. Is derma-rolling painful?
No, it isn’t. The sensations you feel during this effective beauty treatment depend on the size of the needles and how much pressure you use. And home-use derma-rollers use very short needles, which should not actually penetrate the epidermis when used with a light to medium pressure.
If you do experience any pain, this would only be caused by you pressing down too hard.
14. What are the potential side-effects of DIY derma-rolling?
When used correctly and cleaned carefully after each use, side-effects would only be likely if you have very sensitive skin.
However, you can avoid any unwanted effects by not exposing your skin to strong skin exfoliants, waxing or sun-bathing on the same day as a derma-rolling session. And if you have cold winter weather to deal with, this wouldn’t be the best time to use your derma-roller.
Use your derma-roller sensibly when your skin isn’t also struggling with other irritants like beach-time sunshine or cold winds, and you’ll get the full benefits!
15. How often do I need to replace my derma-roller?
This is another important aspect of using a derma-roller safely, as all derma-rollers get blunt in time. With a good quality roller, you can expect it to last for approx. 5 sessions of face, neck and upper chest treatment.
As soon as the needles begin to lose their sharpness, you need to throw the roller away as a blunted roller can cause micro-tears in your skin.
16. How quickly will I see results from DIY derma-rolling?
This depends on how often you use the roller and on your skin type and its condition when you begin treatment sessions. So assuming you have purchased a good-quality derma-roller, your skin could well look plumper and have a nicer glow to it after the first session.
If you are working on improving hyper-pigmentation, uneven complexion, scars, wrinkles and fine lines, you do need to be patient and allow the process of skin repair to work. This may take 4 – 6 weeks to start showing but the secret is regular use and being patient.
Your skin can do amazing things when stimulated by a derma-roller!
17. What to look for when buying the best derma-rollers?
There are many good quality derma-rollers on the market to choose from, but make sure you choose a roller that has approx. 260 needles between a length of 0.25 mm and 0.20 mm.
At least one brand offers 14 k gold-plated needles, which are naturally anti-bacterial for extra safety on skin that has suffered acne infections etc. But, of course, gold needles aren’t affordable for most of us! And with correct cleaning and sterilization, you don’t need to use gold needles.
Other excellent brands offer first-rate, titanium needles with replaceable rollers. Look out for simple derma-rollers, without a lot of ‘added extras’. You need high-quality materials like titanium, to do the best job and be economic to replace as often as needed to keep your skin looking its very best!
So . . . are you ready to try this popular, new, at-home treatment? It’s one of the easiest ways to improve your skin and far more affordable than a salon treatment! Or have you already had some experience as a home user of derma-rolling or tried micro-needling at a salon?
Let us know what results you achieved and whether you agree that it’s something every beauty-conscious woman should try at home! We always love hearing from you!